|
EduWeb Setup Instructions
Downloading
EduWeb from this Website and Creating the EduWeb Setup Folder:
That's the first
thing to do. Using a Windows PC, click the Downloads button at the left, click the
"Download Stu's EduWeb" button and choose
the option to Save to Disk. Select a folder somewhere
on your hard disk, or just save it to your Desktop. The
downloaded file is only 4.4MB in size, so it shouldn't take very
long at all. The downloaded file is called eduwebstart.exe
and this file is used to create your EduWeb Setup folder.
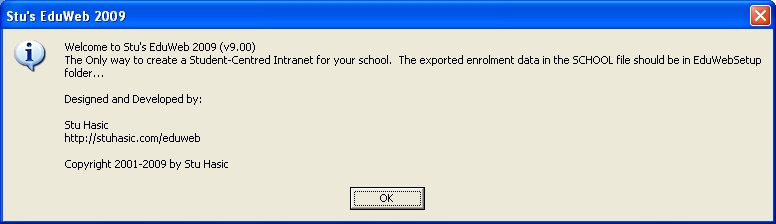
When the download is
complete, double-click the eduwebstart.exe
file you downloaded, read
the screen, click OK, and it will create the
EduWebSetup folder. You must be logged on as a local
administrator (on Windows 2000/XP or later) in order to install EduWeb.
When the
EduWebSetup folder is extracted, some additional notes will be
displayed. Read the screen, then close the information
window. [TOP]
Exporting
Student Information from EMU:
EduWeb does
not use OASIS or ISP Console anymore to build the student intranet
structure.
Instead, the web-based utility called EMU in the NSW DET
Portal is used. You can extract the data it needs if you follow the simple steps
in this brief
PDF document
(you may want to print the steps).
This has now created your EduWeb import file.
It is strongly recommended that you open the StudentsRecord.csv file
using Notepad to check it for errors - particularly to see if it
contains any students that have left your school, or if any
students are listed in the wrong grade or class. When you are
satisfied with the import file, it needs to be copied into the
EduWebSetup folder on C: drive
and you can then use it to create an EduWeb for your
school.
[TOP]
Creating an
EduWeb for Your School:
You now have six
simple decisions to make:
-
What drive are
you going to install your new EduWeb to?
-
What Scholastic
Years do you want to include in the EduWeb?
-
Did you
run EduWeb with your students in the previous year and do you want a link
to that work?
-
Do you
want to run a standard K-6 student setup or an enhanced High
School student setup?
-
If
choosing K-6 setup, do you want
to have a Student Writing Portfolio created for all students?
-
Would you
like a Teacher and Student Evaluation section added to each
student's topics pages? This is useful if you would like
to use EduWeb as the basis of student digital portfolios.
The first question
is pretty easy and by default, it's answered for you. In the
short term you should just install EduWeb onto your local C: drive
and then MOVE it later to the desired location on your fileserver.
The second question
is a little harder. How young is too young to be
developing webpages? The real question is
how prepared
are your teachers to take on webpage development with their
students? Creating a webpage is astonishingly simple.
With programs like MS FrontPage or Web Expression, creating a
page for the school intranet can be as easy as typing a letter using a word
processor.
What's likely to
happen at your school (let's say you're a primary school)
is the senior years will adopt it first, but once it takes off,
expect the younger grades to also take it on. In deciding
what years to include in your EduWeb, remember, you can't add a
year after it's been created (for a calendar year). But what you can do is create
all years and simply disable the links to those years or classes
that won't be participating. If they change their minds
later, just re-enable them.
The third
question is really only for prior EduWeb users. With this
latest
version, you can choose to include a link back to the the
previous year's
student structure which is great for showcasing the ongoing
development of your students' work.
The fourth
question is the one that will require consideration and input
from all staff, particularly if you are a High School. The
standard K-6 setup will produce one main webpage for each
student with 12 topic pages linked to it. This is the only
option available with the K-6 layout and is the same as it has
always been in EduWeb. The new release allows for
multiple subject groupings to be created and linked to
each student page, and each subject grouping can have a
user-definable number of topic pages linked in. So what
you'll need to decide is the following:
-
How many
subject groupings does the school wish to use across ALL
students?
-
What ARE
those subject groupings? - i.e. what will you be naming
the groupings?
-
How many
topics are achievable in all subject groupings in one year?
There is no
point over-designing your high school structure if your
staff/faculties and students aren't able to actually deliver the
content for all of those webpages. Remember, the number of
topic pages each student will have will be the number of subject
groupings multiplied by the number of topic pages in each
subject. If a K-6 school can typically handle only 12 in
one year, what's feasible for a high school?
The fifth
question relates to the Writing Portfolio which is only
available for the K-6 standard layout. This
option includes a set of six word processing templates to allow
students to produce different text types and have them
automatically linked to Topic 12. The benefit of this is that only one topic page is
then used up for the writing portfolio contents. More
information on using the EduWeb Writing Portfolio is included in
the Using EduWeb documentation.
The last question
allows you to decide whether or not you would like a method
of evaluating students' work. Each of the 12 topic pages
created for each student can have an Evaluation section
automatically added to allow for comments to be entered by both
the student and the teacher. While this area is not secure,
and teacher's comments can be changed by the student, you may
still find it useful. If you do not want to have this
evaluation section included, do not check the option box.
When you are
ready to start, follow the steps below:
-
Double-click My
Computer and open C: drive
-
Double-click on
the EduWebSetup folder
-
Double-click on
the eduwebsetup program
-
Read the screen
then click OK
-
EduWeb will
quickly read in all your students (if any errors in the
data are found, you will be alerted). The following
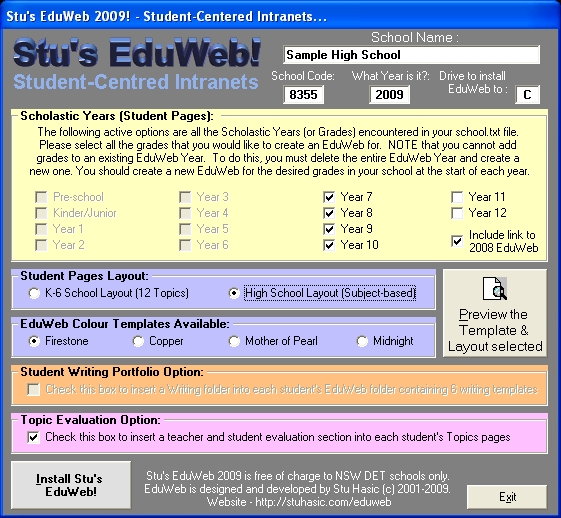
screen will then be displayed:
-
Type your
school's name in full at the top followed by your four-digit
school code.
-
The year will
automatically be entered as this year, but you can change
it if you are living in the past (or the future for that
matter)
-
Type the letter
of the drive where you'd like your EduWeb installed (no
colon required).
It is recommended you choose C: drive then move the
finished structure to your server. C drive is the
default setting.
-
EduWeb will
determine the scholastic years available in your
StudentsRecord.csv
file and allow
you to select those you'd like to include in your EduWeb
-
Select
whether you want to create the K-6 School Layout with 12
Topics, or whether you want the Subject-based High School
Layout. If you choose the standard K-6 Layout, skip
to step 14.
-
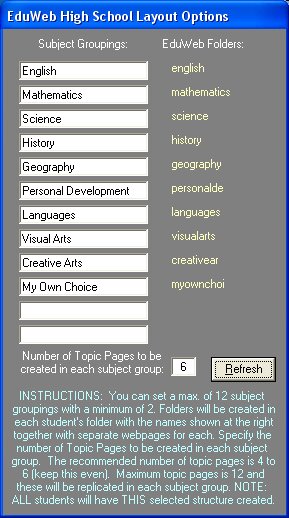
When the High School Layout is selected, the extra
panel shown here at the right will be displayed.
When you have determined your subject grouping
names, type them in the order you would like them to
appear on each student's page. You should type
in the names as shown (in Title Case). You can
type in up to 12 groupings with a minimum of two.
There MUST be an even number of subject groupings.
If you can only work out a odd number of groupings,
you may want to add "My Own Choice" as a grouping
for the students to use to show their own
creativity.
-
When you have typed in all of your desired grouping
names, you need to specify the number of Topic Pages
to be created in each subject group. Again,
this must be an even number, between 2 and 12.
-
Finally, click the Refresh button to generate the
names EduWeb will assign to the folders to be
created inside each student's EduWeb folder.
You will note that EduWeb folders are automatically
converted to lower case with no spaces and symbols
stripped out.
|
 |
-
As well as
the layout type, there are four
different colour-scheme templates available for the webpages
that EduWeb
will create. To see what each combination will look like, make your template and
layout selection and
click the Preview button. This will
open your default browser and display a sample student page
with the selected properties.
Close the browser, choose another combination and click
Preview again to see the alternatives. If you selected
the High School Layout, you will see a non-working version
of what the student pages will look like with your defined
subject groupings.
-
With the K-6
Layout, if you wish
to include a Student Writing Portfolio in every students'
folder, check the Writing folder box.
-
Finally, check
or leave unchecked the option about the Student Evaluation
Section.
-
When done, click
the Install Stu's EduWeb! button. If you get an
error message that you have
chosen an "Invalid Drive
Letter", please read the FAQ page at this site for
details. If you get an
"Error Code 75",
you'll also find the solution on the FAQ page.
-
If everything's
OK, EduWeb will start creating the many, many webpages for
your student-centred intranet. Note that there is no status line that
tells you how long it will take, but you should see
various processing messages.
A typical school of 350 students might take a two or three minutes to
install. Be patient! On Windows XP, for some
reason or other, the messages may stop flashing on the screen,
but the processing is continuing.
Just wait until you
get the message that the installation is complete.
-
In the end, a
message should appear telling you just how many webpages
EduWeb has created for you on your selected drive.
-
Click the OK
button to close Stu's EduWeb and display the opening screen
for your new School Intranet.
[TOP]
Viewing
Your New EduWeb:
Open My Computer,
choose the drive you installed the EduWeb onto, open the EduWeb
folder and double-click the index.htm file. It should
open your internet browser (IE or Firefox) and display the
starting page.
Click through each
of the areas of your new school intranet to verify everything
looks OK. The Student Pages section in particular is
important to check. Inside that section should be links to
each of the scholastic years selected during the installation
process, and inside those should be the various classes and
individual student websites. [TOP]
Moving Your
EduWeb to Your School's Fileserver:
-
Additional
guidance for this process is available in
these notes
(Acrobat Reader required)
-
If you already
have an older EduWeb structure on your server that you wish
to keep, please follow the advice in this
Update Guide
This process
should only be performed by the school's network administrator.
EduWeb can be run from virtually any fileserver:
-
Windows
NT/2000/2003 Server
-
Novell Netware
3.12/4.11/5/6/7 Server
-
Apple OSX Server
10.1 or later
-
GProxy/Sentral Server
-
Virtually any
Linux/Unix server using Samba Filesharing
Remember, EduWeb
is best run from a Fileserver, not a Webserver - accessing
EduWeb webpages should be using file:// protocol rather than
http:// protocol. The reason for this is it allows for
standard network operating system access rights (privileges) to
be applied and also allows for DIRECT editing of webpages using
FrontPage, Web Expression, Dreamweaver or any other webpage
editing tool.
To transfer
your created EduWeb to the school's fileserver, follow these
general steps:
-
Connect and
logon to the server using the PC where EduWeb was created as
an administrator or equivalent
-
Determine which
server volume (hard disk) you want your EduWeb to be accessed
from
-
Create a folder
called intranet in that hard disk volume
-
Drag (copy) the
eduweb folder from C: drive on the PC to the
intranet folder on the server - you should end up with a
copy of the eduweb folder inside the intranet folder
-
Make the
intranet folder (not the eduweb folder) a
network share - this should allow workstations to
access EduWeb on the server using the UNC path of
\\servername\intranet - opening that path should display the
eduweb folder.
-
For all Windows
PCs, strongly consider mapping a drive letter to the intranet
share to make access to the eduweb folder easier. For
Windows servers, this can be achieved in a login script batch
file using a command like NET USE W: \\servername\intranet
- for Netware servers, a login script command like MAP ROOT
W:=VOL1:intranet - the actual commands required will be
dependent on your desired drive letter mapping, server name
and/or volume name. With an Apple Mac or Linux server,
mapping a drive letter on a Windows workstation is performed
using Windows Explorer/Tools/Map a Network Drive [TOP]
Setting User Access Rights (Privileges) to the various
sections of EduWeb:
With EduWeb
being a whole-school intranet solution, it is VERY
important to set user access rights or privileges to the various
separate sections (folders) that make up the EduWeb system.
The process for doing this totally depends on the server
operating system being used. The steps in Windows 2000 are
very different to those in Novell Netware and likewise with
Apple servers and Linux servers. This document will NOT
attempt to explain the step-by-step processes of applying access
rights to folders. For this reason, it is essential
that this process be performed by a network administrator.
In general terms,
EduWeb requires an absolute minimum of two separate logon
accounts for your server, one for students and one for staff.
With this basic scenario:
-
The STUDENT
account would be allocated READ-ONLY rights to the
EduWeb folder and below and Read/Write/Change
(full) rights to the eduweb\2006 folder and below
(the student area). The STUDENT account also
needs Read/Write/Change (full) rights to the eduweb\news\subs
folder. There should be NO access rights set to the
eduweb\staff folder.
-
The STAFF
account would be allocated Read/Write/Change (full)
rights to the EduWeb folder and below - including the
student area.
With this setup,
students will be able to view but not change most of the EduWeb
intranet, edit all files in the student area, submit news
items, but not see any part of the Staff intranet section.
Staff have full access to all aspects of EduWeb.
While this
configuration will be suitable for many smaller K-6 schools, it
opens the risk of having students editing other students'
webpages. It also allows all staff to access and change
all areas of EduWeb. It is certainly NOT recommended for
high schools and primary schools wanting to use EduWeb
effectively for digital portfolios or other structured
publishing work. For these schools, the most secure way of
protecting students pages is to allocate individual logon
account names to the server for each student and allocating user
rights to their own EduWeb path for each user. Take a look
at my two "Individual Student
Login Wizards" I developed for Windows
200x Server and Novell
Netware.
The table below
looks at each of the folders that make up EduWeb and details the
access rights needed. Rights marked with asterisks (*)
have further information below the table:
|
EduWeb Module |
Folder Name(s) |
Administrator |
General Staff |
General Student |
|
Home Page |
\eduweb |
Full |
Read-only |
Read-only |
|
School Info Page |
\eduweb\school |
Full |
Read-only |
Read-only |
|
History |
...\history |
Full |
Full |
Read-only |
|
Rules |
...\rules |
Full |
Full |
Read-only |
|
Policies |
...\policies |
Full |
Full |
Read-only |
|
Library |
...\library |
Full |
Full |
Read-only |
|
Sport |
...\sport |
Full |
Full |
Read-only |
|
Canteen |
...\canteen |
Full |
Full |
Read-only |
|
Calendar |
\eduweb\calendar |
Full |
Full |
Read-only |
|
News |
\eduweb\news |
Full |
Full |
Read-only |
|
News submissions |
...\subs |
Full |
Full |
Full |
|
Staff Page |
\eduweb\staff |
Full |
Full |
NONE |
|
Memoranda |
...\memos |
Full |
Full |
NONE |
|
Staff Bulletin |
...\bulletin |
Full |
Full |
NONE |
|
Bulletin submissions |
...\bulletin\subs |
Full |
Full |
NONE |
|
Staff Calendar |
...\calendar |
Full |
Full |
NONE |
|
Playground Duty |
...\playduty |
Full |
Full |
NONE |
|
K-6 Continuum |
...\continuum |
Full |
Full |
NONE |
|
EduWeb TaskForce |
...\taskforce |
Full |
Full |
NONE |
|
Staff Links |
...\links |
Full |
Full |
NONE |
|
Student Pages |
\eduweb\2010 (2011 etc) |
Full |
Full |
Full* |
|
Groups Pages |
\eduweb\groups |
Full |
Read-only |
Read-only** |
|
SRC |
...\src |
Full |
Read-only |
Read-only** |
|
School Band |
...\schoolband |
Full |
Read-only |
Read-only** |
|
School Choir |
...\schoolchoir |
Full |
Read-only |
Read-only** |
|
Debating |
...\debating |
Full |
Read-only |
Read-only** |
|
Drama |
...\drama |
Full |
Read-only |
Read-only** |
|
Chess Club |
...\chess |
Full |
Read-only |
Read-only** |
|
Photo Galleries |
\eduweb\photos |
Full |
Full |
Read-only*** |
|
Links |
\eduweb\links |
Full |
Full |
Read-only |
* Full access
rights should only be granted to the Student Pages if there is
only one student logon account available in small school
situations. With individual
student accounts, or class/year accounts, Full access rights
should only be allocated to the specific student folders.
** A separate Group account for each group should be created with Full access
rights to the appropriate group folder to allow member students to manage these pages.
*** A separate Photos account could be created to allow Full
access rights to certain students to manage the Photo Galleries.
[TOP]
Final EduWeb
Setup Steps:
-
Learn
everything about using EduWeb by reading the
Using EduWeb documentation.
-
Check out the
On-line Self-Paced EduWeb Training System by clicking
here
-
Make a
shortcut on the Desktop of each workstation to the index.htm file in the EduWeb
folder OR
-
Make this EduWeb start page your Home Page on all your browsers
-
Make a
shortcut to the Ewshrtct.exe program in the EduWeb folder (if
you
are a Windows school) and tell your students to
"login" to EduWeb before they edit their pages. That way, they can jump to their
own EduWeb folder very easily
-
Run the
program STULIBFIX.EXE (which you'll find in the EduWeb
folder) on all Windows workstations when logged on as an
Administrator. This will ensure all Windows Libraries
and Support Files are installed and ready for use (not
required for the new Lenovo PCs in schools).
-
BACKUP your
EduWeb to another computer's hard disk EVERY DAY! Don't think this is not important. It's
VERY important. NOTE: If you backup to a CD-R, every
file will be marked with a Read-Only attribute which will stay
with the files if they are restored to the server. This
attribute will need to be removed before the files can be
editable.
-
Download the
instructions (mini posters) for how to Edit your EduWeb Pages
with either Windows or Mac from the Downloads page
-
Use the
EduWeb
Templates Toolkit to introduce direction to your use of
your EduWeb
-
Read the FAQ
page for more information about EduWeb and using it
-
Send me any
feedback you have about the EduWeb system and how it's
being used in your school.
[TOP]
Stu's EduWeb is designed
and developed by Stuart Hasic -
stu_hasic@yahoo.com.
It is available free of charge for public schools in the
state of New South Wales in Australia only. Other
schools interested in Stu's EduWeb should contact the
developer directly. (c) 2001-2010 by Stuart Hasic
|